
The Kamco quick guide to power flushing
This step by step guide covers the basics of a power flush. For advice on specific problems or situations refer to the Power Flushing Support section of our web site, or call Kamco on 01727 875020.
1.
What’s in the box
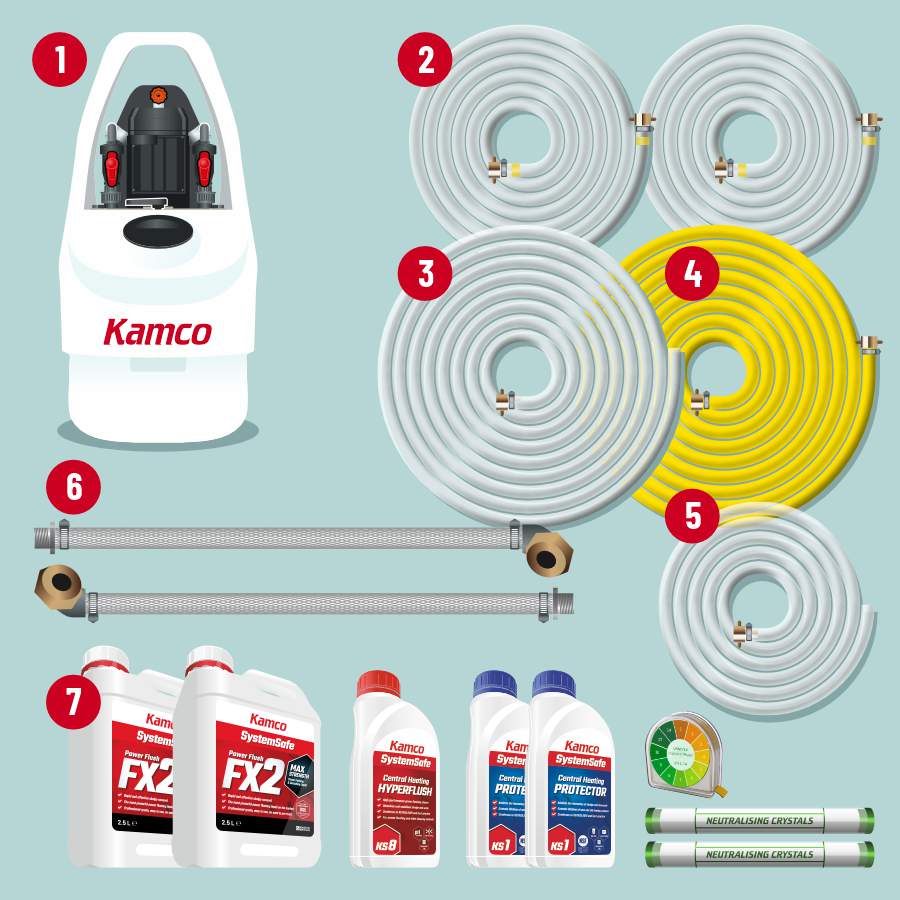
- CLEARFLOW PUMP
- FLOW AND RETURN HOSE (2x 5m)
- DUMP HOSE (8m)
- WATER INLET HOSE (8m)
- OVERFLOW HOSE (3m)
- CIRCULATOR PUMP ADAPTER HOSES
- KAMCO CHEMICAL STARTER PACK
Also included: BSP Adapters (10 pack)
2.
Valves and flow reverser
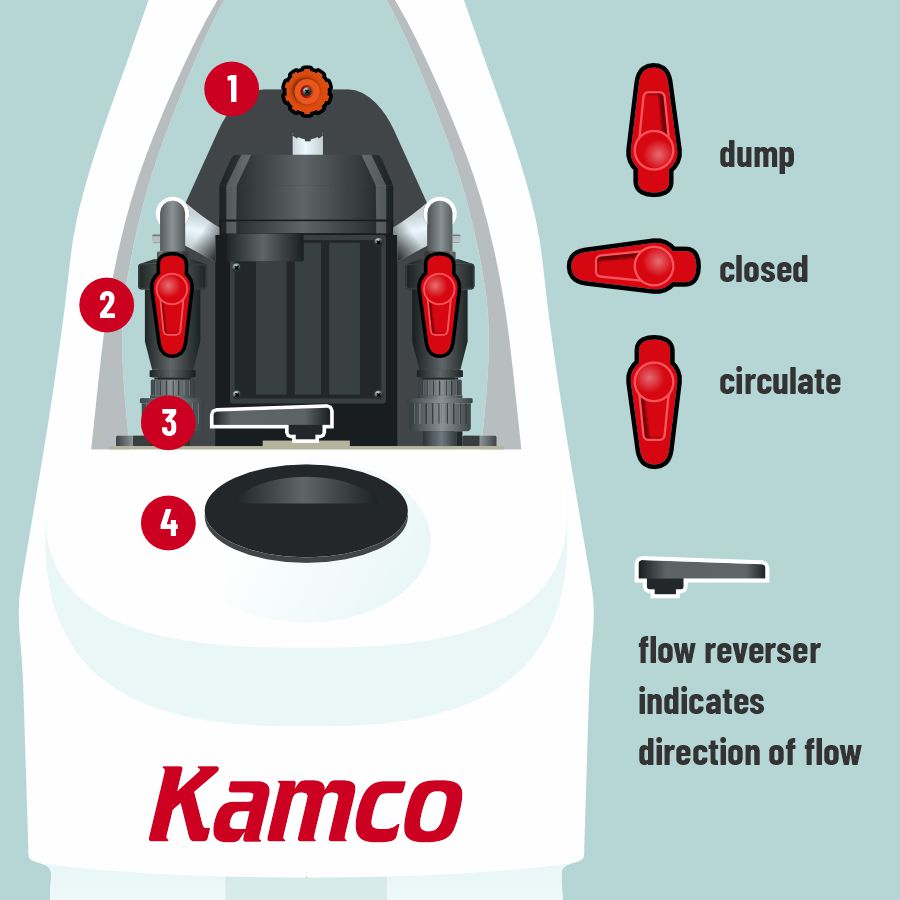
- WATER INLET VALVE (location may vary)
- ISOLATION VALVES (2x)
- FLOW REVERSER LEVER
- HOLDING TANK ACCESS CAP
3.
Locating the clearflow pump
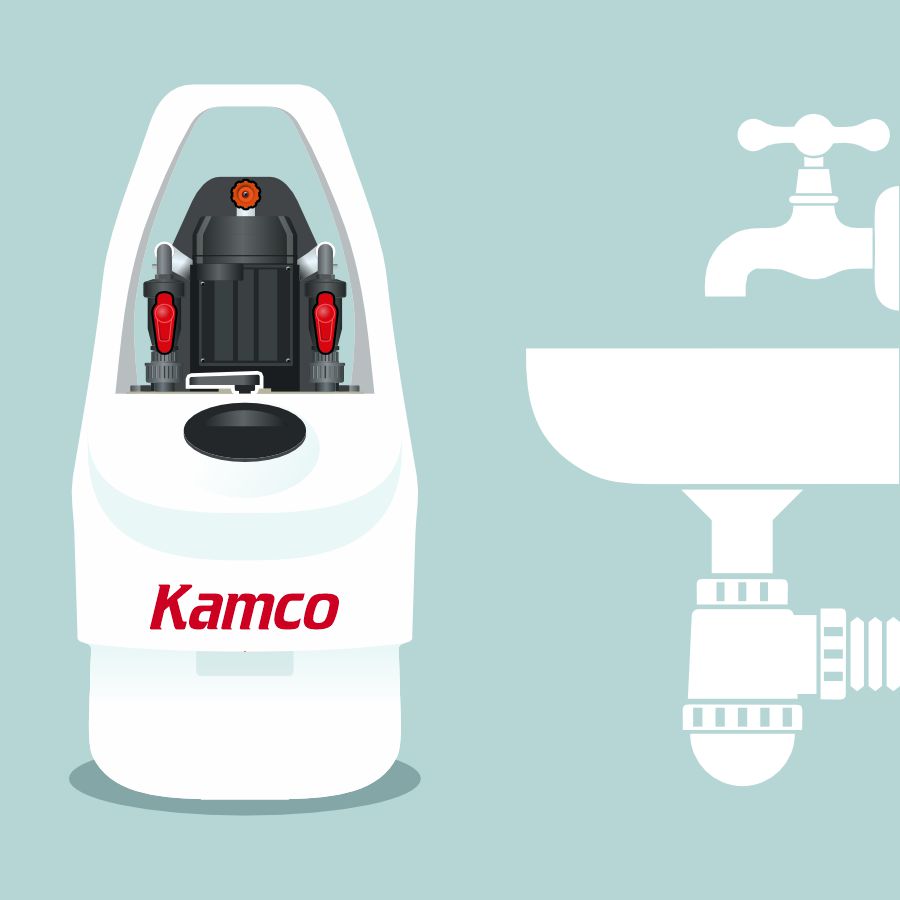
- Locate close to supply of mains water
- Locate close to foul water waste drain
4.
Connecting hoses to pump
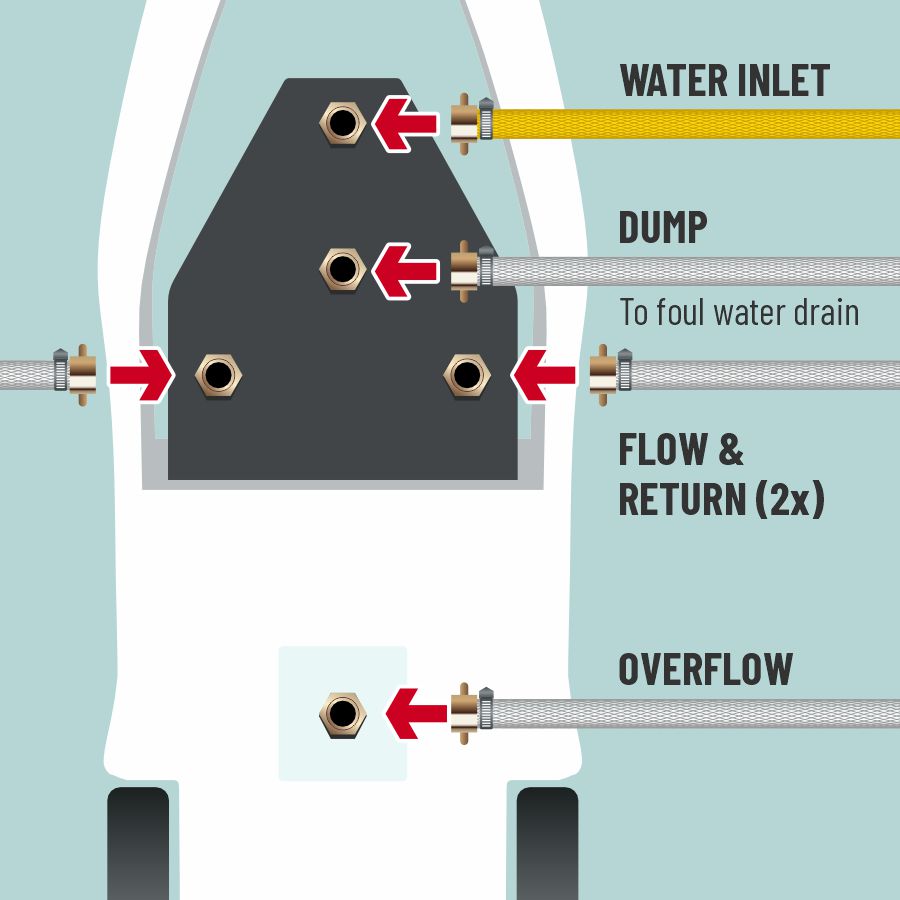
- Connect hoses firmly by hand
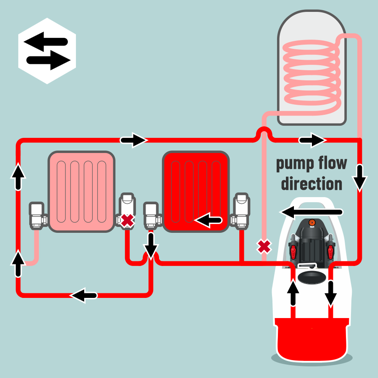
5.
Seal off vented systems
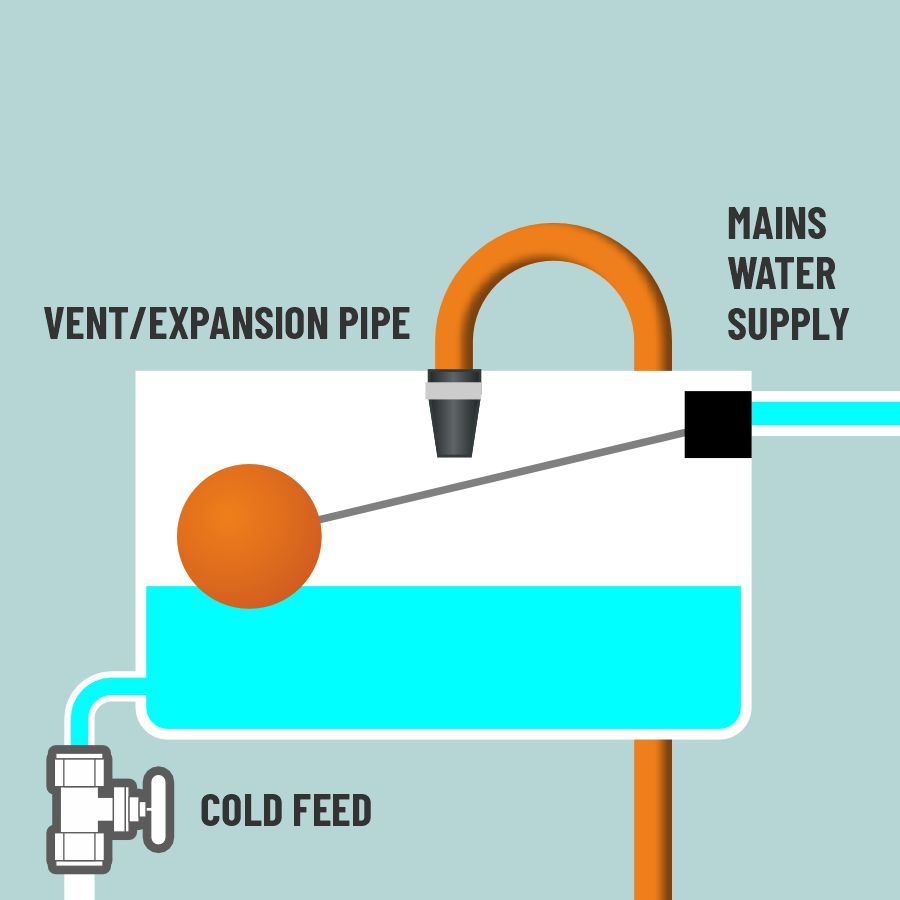
- Isolate mains water supply
- Isolate cold feed
- Fit temporary cap to expansion/vent pipe
6.
Adjusting thermostatic valves
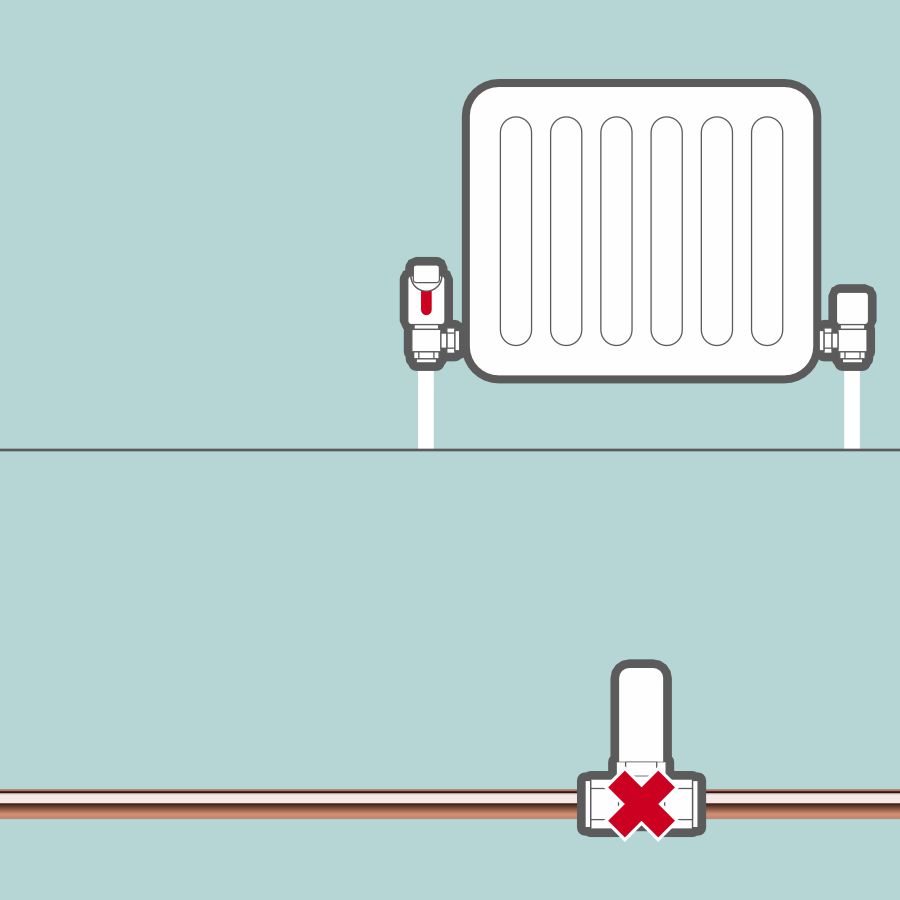
- Set thermostatic radiator valves to maximum
- Remove thermostatic valve heads
- Close by-pass
- Close auto by-pass (if present)
7.
Methods for connection
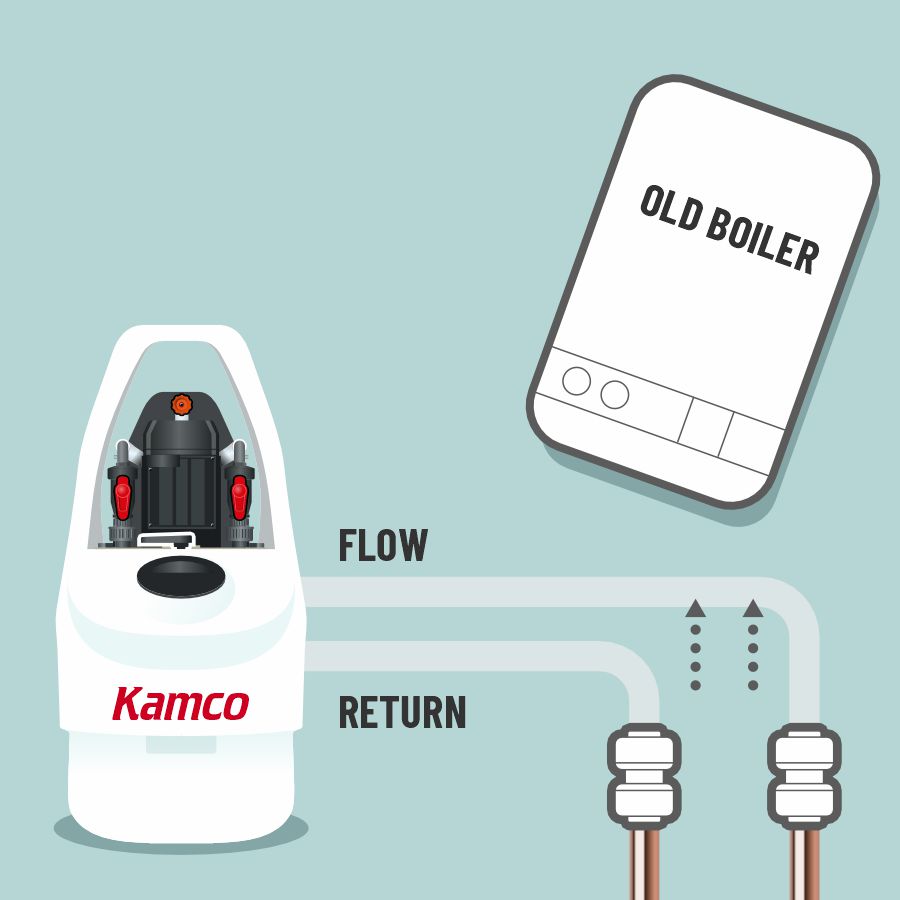
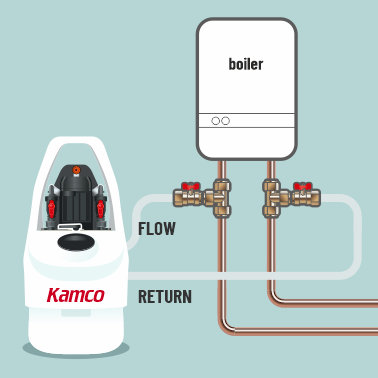
Replacing the boiler
- Connect across flow and return pipes after boiler has been removed
8.
Methods for connection
Remove circulator pump
- Connect to circulator pump connections using adapter hoses supplied
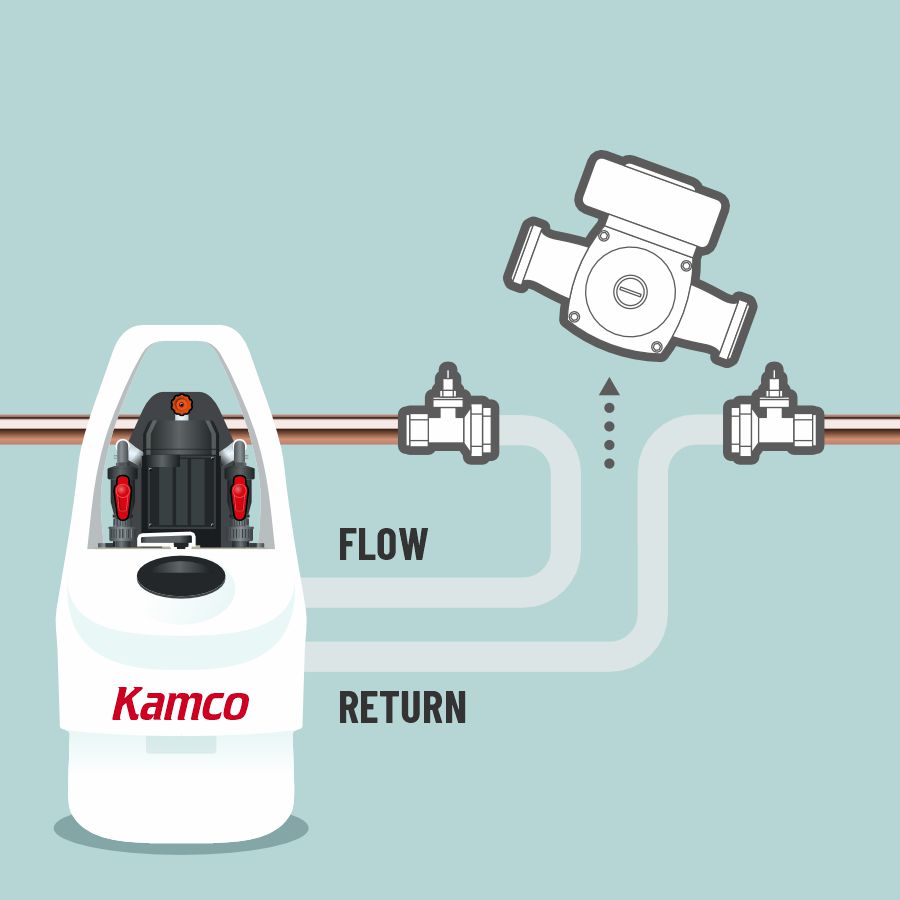
9.
Methods for connection
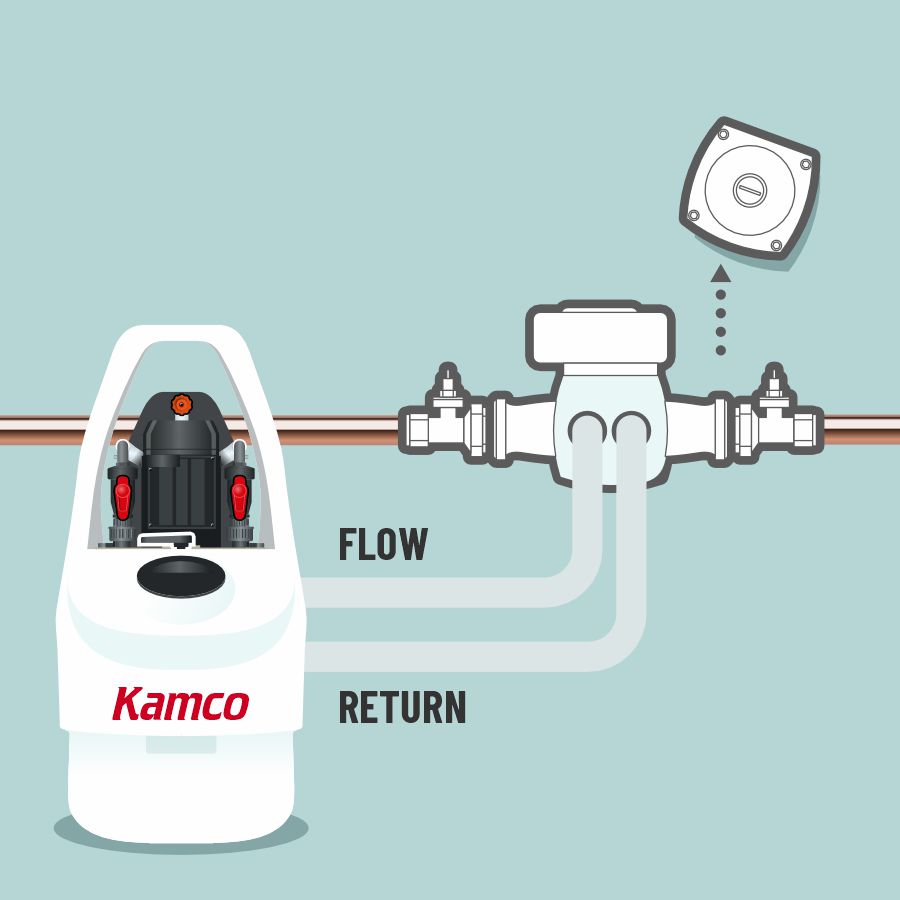
CP2 circulator pump adapter
- Remove circulator pump head only
- Connect CP2 or circulator pump body
- Connect Clearflow Pump with hoses supplied with CP2
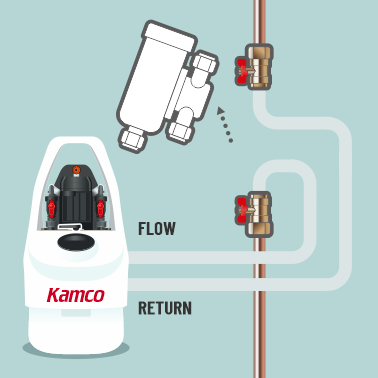
10.
Methods for connection
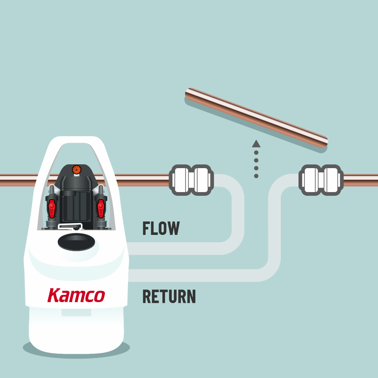
Break into copper pipe
- Remove a section of copper pipe
- Connect with push fit connectors
11.
Methods for connection
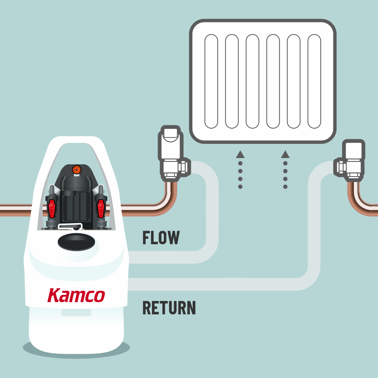
Remove a radiator
- Connect Clearflow to radiator valve bodies (not suitable for microbore systems)
12.
Methods for connection
Connect to boiler tails
- Tees and valves may be fitted to boiler tails for convenient connection in the future
13.
Methods for connection
Remove magnetic filter
- Connect to pipework/isolation valves after removal of filter
14.
Faster power flushing
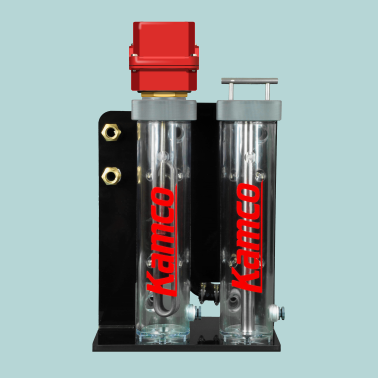
Kamco CombiMAG
- Quickly captures magnetic debris
- Speeds up flushing process
- Reduces water usage
- Customers can see what WAS in their system
15.
Connecting CombiMAG
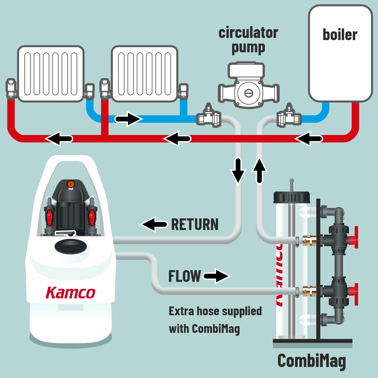
- Connect CombiMAG to system using hoses and adapters supplied with CombiMAG
- CombiMAG may be connected along side Clearflow in a variety of locations
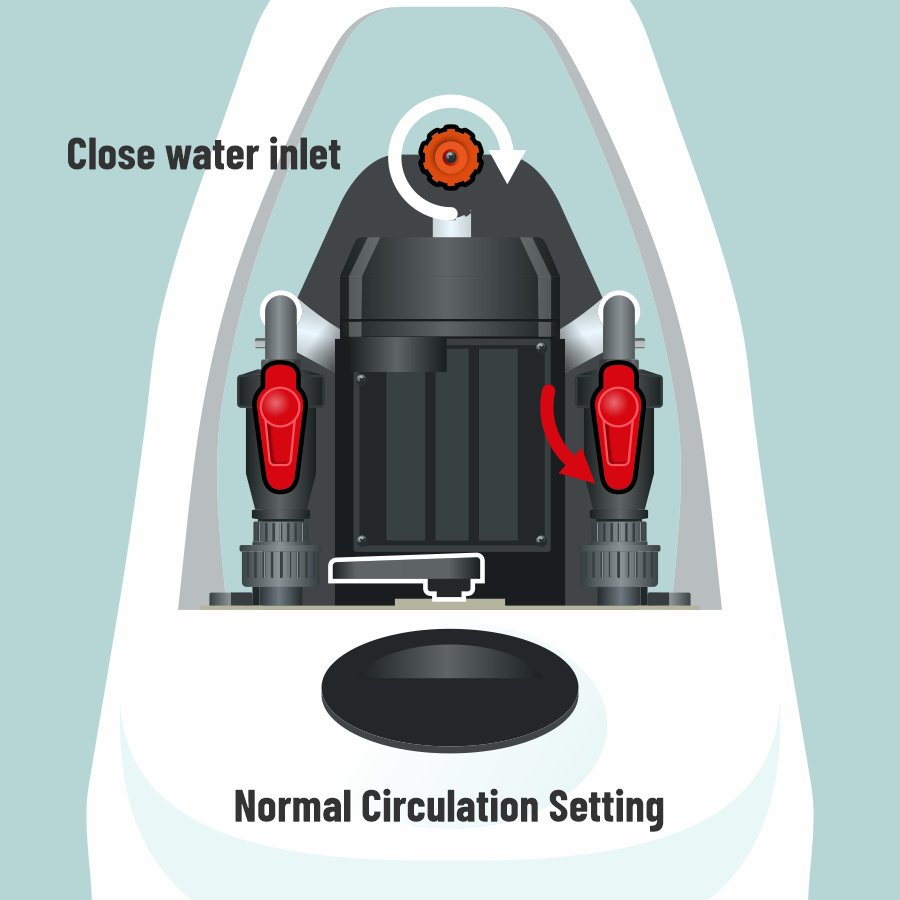
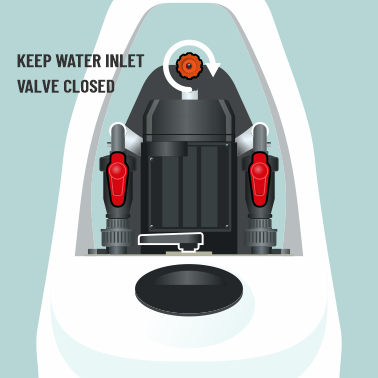
16.
Prepare clearflow pump
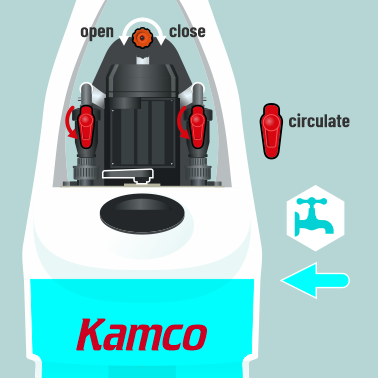
- Open water inlet valve
- Allow holding tank to fill to half way
- Close water inlet valve
- Set both isolation valves to downward “circulate” position
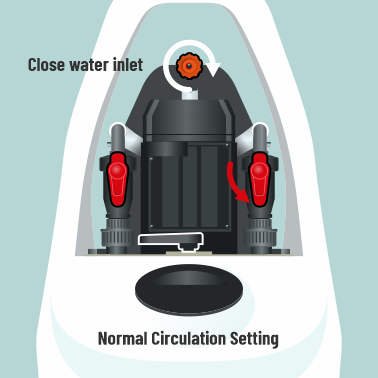
17.
Power flushing begins
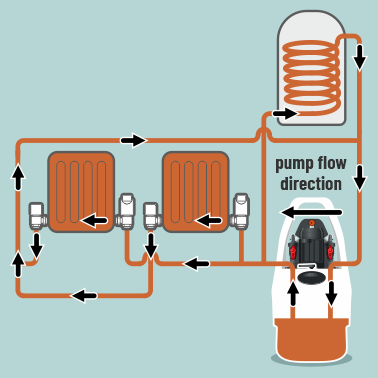
- System is wide open
- Activate main power switch on top of the motor housing
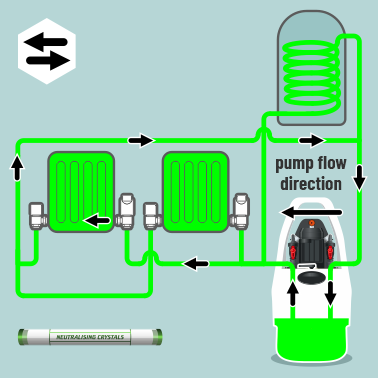
18.
Reverse direction of flow
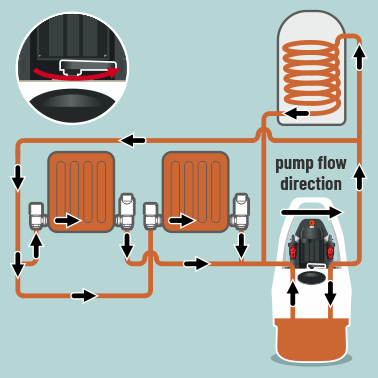
- Rotate flow reversal lever through 90° from left to right
- System is wide open
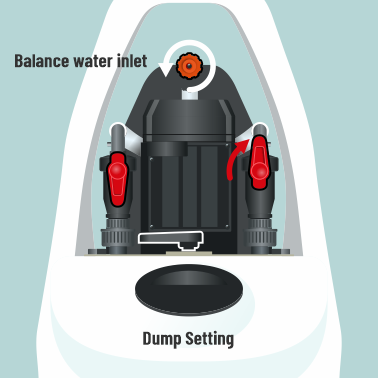
19.
Set valves to dump

- Isolation valve to the opposite side of flow direction is set upwards to “dump”
- Water inlet valve is balanced to maintain water level in the holding tank
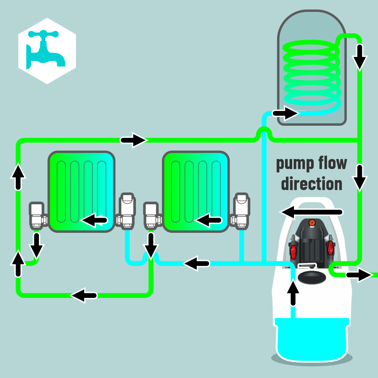
20.
Dump radiators & cylinder*

- System is wide open
- Dump to foul water waste drain (*if cylinder is present)
21.
Dump until water clears

- System is wide open
22.
Set valves to circulate

- Ensure water inlet valve is closed
- Reset isolation valve to downward position
23.
Add power flush FX2

- KAMCO recommends Power Flush FX2
- Max power, no need to pre-treat
- Add FX2 to holding tank via access cap
24.
Circulate FX2
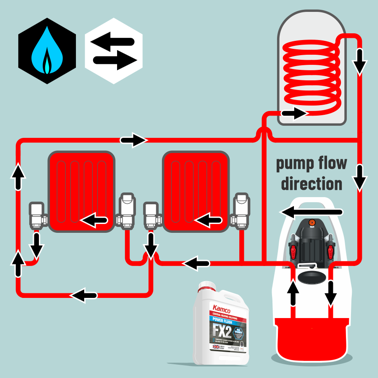
- Circulate FX2 throughout system
- Turn on boiler, heat system to 50°C
- Turn off boiler
- Reverse flow regularly
25.
Isolate radiators
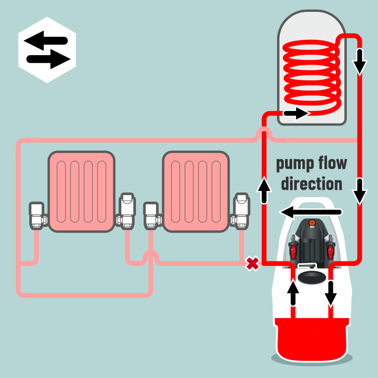
- Circulate FX2 through cylinder coil only (*if cylinder is present)
- Reverse flow regularly
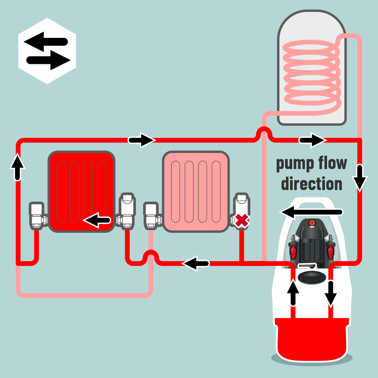
26.
Open radiator 1
- Isolate cylinder
- Open radiator 1
- Circulate FX2 through radiator 1 only
- Reverse flow regularly
27.
Open radiator 2
- Close radiator 1
- Open radiator 2
- Circulate FX2 through radiator 2 only
- Reverse flow regularly
- Repeat this process with all the remaining radiators on the system
28.
Set valves to dump

- Isolation valve to the opposite side of flow direction is set upwards to “dump”
- Water inlet valve is balanced to maintain water level in the holding tank
29.
Dump radiators
- Dump radiators individually and in reverse order
- Dump until water runs clear
- Repeat step on all radiators on the system
30.
Dump cylinder
- If no cylinder is present, go to next step
31.
Set valves to circulate
- Ensure water inlet valve is closed
- Reset isolation valve to downward position
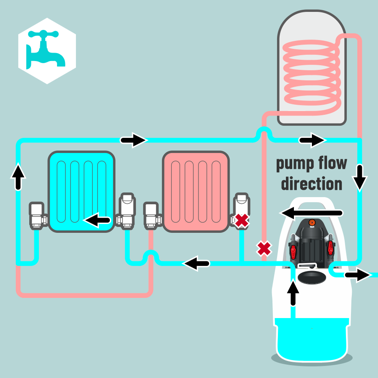
32.
Add neutralising crystals
- Open system
- Circulate neutralising crystals
- Reverse flow regularly
33.
Set valves to dump
- Isolation valve to the opposite side of flow direction is set upwards to “dump”
- Water inlet valve is balanced to maintain water level in the holding tank
34.
Dump neutralised water
- System is wide open
35.
Dump system

- Dump until water runs clear
36.
Test dump water
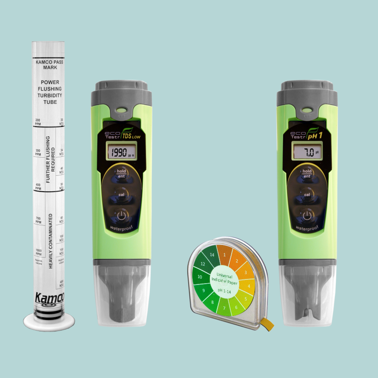
- When dumped water runs clear test it to be sure
- Test with Turbidity Tube and TDS Meter
- If Power Flush FX2 chemical has been used,then test with pH Paper or pH Meter as well.
37.
Test for contaminants
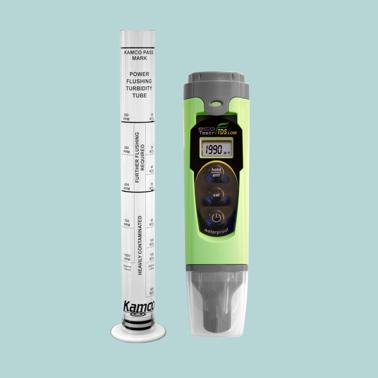
- Use a turbidity tube to ensure that no particulate or solid contaminants still present
- Use a TDS meter to ensure that no soluble contaminants are still present.
38.
Get to pH7 neutral

- Dumped water with a pH test of 7 is neutral
- Lower pH levels will lead to corrosion in the system
- Higher pH can damage aluminium if present
39.
Set valves to circulate
- Ensure water inlet valve is closed
- Reset isolation valve to downward position
40.
Systemsafe DM

- For best results Kamco recommends using SYSTEMSAFE DM corrosion inhibitor with every power flush
- Complies with: BS7593 and Building Regulations Part L
41.
Circulate Systemsafe DM
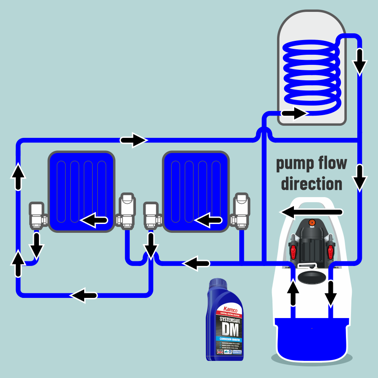
- Add SYSTEMSAFE DM to holding tank via access cap
- Circulate SYSTEMSAFE DM
- System is wide open
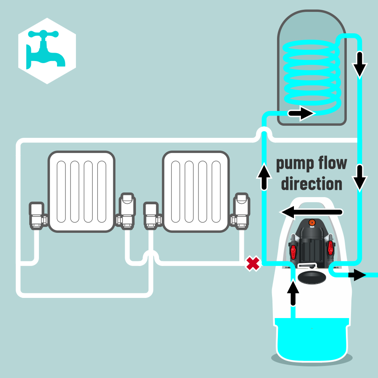
42.
Disconnect and dump
- Turn Clearflow power off
- Disconnect flow and return from system
- Run flow hose to foul water drain waste
- Turn on Clearflow power, dump holding tank via flow hose to foul water waste
43.
Radiator heat distribution
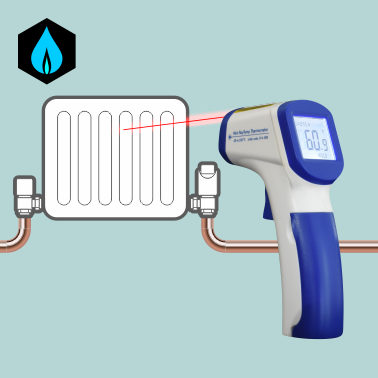
- Turn on boiler
- Use an Infrared Thermometer to demonstrate more even heating of radiators with cold areas removed
44.
Leave a record
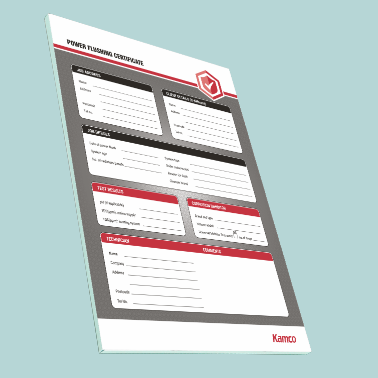
- Complete a Power Flushing Certificate to leave with the householder, retain the carbon copy for your records